Project 300ZX [11] - 'Tis the season for reupholstery
I finally got a hold of my new trim kit for the Z interior, gray Alcantara with 13 pieces that cover all places that came with some suede-like fabric originally. I also ordered new leather covers for the seats (which are leather all-around, inlike the original covers with are real leather on the front and synthetic on the backs). Ordered from interior-innovations.com, for about $750 with shipping.
Let's quickly remember the status of the seats and trim:


 Yeah, they needed replacement.
So this is the 13-piece kit, more or less.
 The sections they cover are:
Anyway, it seems fairly flexible so that it will be possible to shape the trim pieces over the irregular, curved surfaces.
Ok, so first things first. I need to remove the pieces before I can peel off the worn trim material and fit in the new one. I started with the door panels, since I found a nice writeup for the procedure (it was for replacing the factory speakers, but good enough).
 This is a plastic cover you remove to expose a screw that needs removing to get access to the door panel.

 Then there are the different caps and screws and stuff to remove from the door.


 Then finally, you lift the panels, pop off a few plastic fasteners, disconnect wires, and the panel is yours, baby!
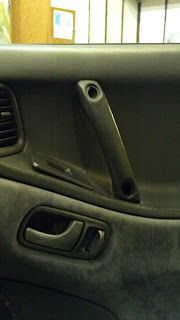
 On to start peeling off the original trim inserts. It's only that middle section in the picture. I started to get cold feet about these pieces because of the irregular shape and needing to fit the edges in those creases where the trim meets the rest of the door panel. Mmh, I may need professional help, but I'll try to keep that to a minimum and do it myself as much as I can. I hope the other pieces look easier.


 Ok so now on to the glovebox and its companion side trim piece. Fairly easy to remove.
 This is the glovebox trim. I'll use the old piece as a template and cut the new pieces, since they come in roughly the shape, but nowhere near to being ready to install. Bummer.

 Let's get some scissors and start trimming! This Alcantara is easy to cut with regular scissors but careful, you don't want to trim too much in any direction, leaving a bold patch if you're unable to stretch it enough when fitting.
 I removed the seats to make everything easier to work on. And the seats needed to come off anyway.

Fast forward many hours and cursing and trial and error and this is how the glovebox and side piece look like when reinstalled. Yay! First two pieces done! 11 to go.
Those marks you see are what naturally happens when handling the surface... it's just the way the surface of the fabric behaves. You can easily comb it back to look even.
 The center armrest was next, and it was a little bit easier, now that I had done it and gained a little experience. Plus, these were not-so complicated surfaces.
By the way, the glue I'm using is called "Super 77" and it's made by 3M. About $10 a can, and it pretty much lasts for the whole job. It's a spray can wich makes it very easy to apply, but you really have very limited time to peel back and reattach when stretching and shaping the trim pieces. Takes some practice to get it right. At least you can always peel everything off, wait until it's completely dry, and try again from scratch.
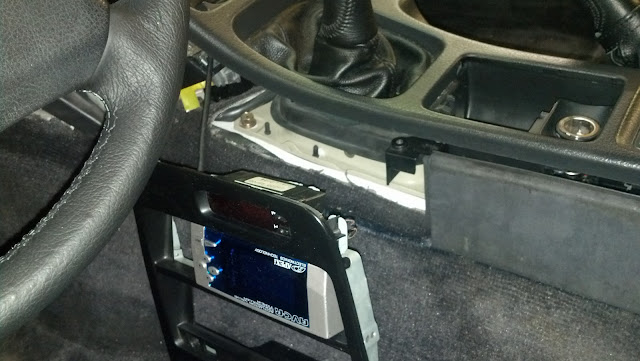
 Now on to remove the center console pieces. I had already removed the center console to replace the shift knob and e-brake handles and boots. The side panels just took a few more screws to remove.
 The old trim, which again I will use as a template for cutting the new piece.
 This is the naked right-side rear console trim piece, and the one behind it is the pretty much rectangular left-side rear console trim piece.
 This is how it looks once you fold it over and glue it to the back side of the piece.
 And another angle. It doesn't look too beautiful but who cares, it's the back side.
 When there are bends and concave sections, it's really hard to get it stretched on the convex part and perfectly flat in the convex part. Here you see some wrinkles that frankly I was unable to completely get rid of.
 This is the shape of the front console trim piece, the right side meets the glovebox and the left side meets the piece under the steering wheel.
 And this is how that right-side upper console trim piece looks like when back in its place.
 Now for the back of the seats. There are three trim pieces here. A center one that kind of flows top to bottom to meet the center armrest, and two side pieces which have carpeting on the bottom and a suede trim piece that I'll replace on the top.
 Somewhere there are part of the car's electronics (the ABS module, and what appears to be the ECU on the other side), and also something that's called the "headlight aiming kit", some sort of special purpose tools for doing just that. I cant't be bothered with those right now.
 A reverse angle of the section to the back of the seats, naked.
 And this is how one of the rear side pieces look. You see the black carpeting and the charcoal suede trim on top. It's not actually in bad shape, but of course everything needs to go, to get a uniform look. To the right of the piece, ahem, one of the most important supplies for this kind of work. Beer!
 This is the piece that goes below the steering wheel. In the end, I took this piece and both door panels to a professional upholsterer. The shop is called Sid's Upholstery, owned by Hugo, a Peruvian who started working for Sid, and eventually bought the shop from him... nice guy. Kind of expensive but the work is really top notch (I got a recommendation from colleagues in a discussion group at work). This piece is absolutely perfect, even with foaming underneath. It feels really great.
 The door panel... there's no fucking way I would have done it in a remotely acceptable level of quality. It even required some stitching to fit properly.
 Some more detail...
 And even more detail.

 ...And the seats. Oh, glorious seats. The work Hugo did is simply outstanding. The strengthened the frame (which was actually cracked in a couple spots) and applied foaming to give it the perfect shape and feel. It feels great, I tried it and wanted to spend the night there. Then again, it's a little cold in the garage so I eventually got up.
 Let's take this opportunity to give the carpets under the seats a good cleaning and vacuuming, before reinstalling them. Actually I'll wait until all the pieces are back in place before reinstalling the seats, to make the job easier.
 Again, fast forward countless nights, more cursing, more beer, and a really sore right thumb, and this is the rear section reinstalled. You can see the center piece I mentioned. It "flows" down, doesn't it? Right? Right?
Anyway, I know, fit and finish are not Audi-like... but I wiggled everything back in place the best I could. Ok? Give me a break.
 Another angle for the rear section.
 Left upper console and below steering wheel. Nice.
 Right upper console, glovebox and it's side piece. Again, fit and finish... but in my defense it didn't fit much better before, either. To the left of the glovebox you can see imperfections, a lump in the trim, and you can't tell in the picture, but the Alcantara actually got stained with the glue near the handle. Ouch! It's really a delicate job keeping the sprayed glue from ever touching the front-side of the Alcantara. But I can proudly say I mostly pulled that one off.
 Left of the center console.
 Left and rear of the console.
 And now the seats back in place. The look gorgeous.
 A wider look at the seats and center console.
 The right of the center console. That came out nice.
 Right and rear sections of the center console.
I can't wait to drive this baby! I haven't taken it out of the garage yet. It's been raining quite heavily and pretty much every other day, and my rear tires are pretty much shot, so much so that I get wheelspin when starting off of a streetlight, even if I try to do it gingerly. Not safe.
The door panels are still off, because I ordered new armrests for them and I'm not removing the panels to install them when they arrive. So I'm waiting for those to put the final pieces in place and enjoy my new interior!
I don't want to end this post without some deep reflections and insightful conclusions (not!) about the whole experience. This thing took me many hours. Many. And since I usually started pretty late at night to begin with, it got very tiring. Would I do it again? Not in a million years. But I'm glad I did it once! It was an interesting experience in many ways: I discovered new skills, learned as I went, and it kind of leaves you with a new respect for people that do this thing for a living, and excel at it. But most of all, seeing what you accomplished, with all the imperfections and fuckups, whatever, it still gives you a big sense of pride and makes it all the more enjoyable when you use the car afterwards. In the end, that's one of the main reasons I embarked in this whole car restoration project. It will not turn out to be a showroom car, I know. And certainly I won't make a profit when I finally sell the beast but it doesn't matter. It's the journey, not the destination that makes it worth.
And now, more pictures of the seats. Just because I didn't have any pictures of cats handy.


Next steps:
Well there is a little leak from the upper seal of the left-side door (when the car stayed out during some heavy rain, a little water managed to get in and go down the driver's side window), but we'll see if it can be repaired (replacement is something like $800, WTF I don't know why so much for a freaking rubber seal!) And the door handles have seen better days. And there's also... ok, that's enough!
Other nits here and there, but nothing serious... really I can see myself taking this thing for a cruise and just feeling cool in it. Hopefully by the end of January. Stay tuned!
Let's quickly remember the status of the seats and trim:


So this is the 13-piece kit, more or less.

- Behind the seats: center piece and two side inserts
- Doors: one insert in each
- Center armrest
- Center console: left and right of the lower console, and left and right of the upper console.
- Glove box and small trim piece to its right
- Under the steering wheel
Anyway, it seems fairly flexible so that it will be possible to shape the trim pieces over the irregular, curved surfaces.
Ok, so first things first. I need to remove the pieces before I can peel off the worn trim material and fit in the new one. I started with the door panels, since I found a nice writeup for the procedure (it was for replacing the factory speakers, but good enough).


Fast forward many hours and cursing and trial and error and this is how the glovebox and side piece look like when reinstalled. Yay! First two pieces done! 11 to go.
Those marks you see are what naturally happens when handling the surface... it's just the way the surface of the fabric behaves. You can easily comb it back to look even.

By the way, the glue I'm using is called "Super 77" and it's made by 3M. About $10 a can, and it pretty much lasts for the whole job. It's a spray can wich makes it very easy to apply, but you really have very limited time to peel back and reattach when stretching and shaping the trim pieces. Takes some practice to get it right. At least you can always peel everything off, wait until it's completely dry, and try again from scratch.


Anyway, I know, fit and finish are not Audi-like... but I wiggled everything back in place the best I could. Ok? Give me a break.


I can't wait to drive this baby! I haven't taken it out of the garage yet. It's been raining quite heavily and pretty much every other day, and my rear tires are pretty much shot, so much so that I get wheelspin when starting off of a streetlight, even if I try to do it gingerly. Not safe.
The door panels are still off, because I ordered new armrests for them and I'm not removing the panels to install them when they arrive. So I'm waiting for those to put the final pieces in place and enjoy my new interior!
I don't want to end this post without some deep reflections and insightful conclusions (not!) about the whole experience. This thing took me many hours. Many. And since I usually started pretty late at night to begin with, it got very tiring. Would I do it again? Not in a million years. But I'm glad I did it once! It was an interesting experience in many ways: I discovered new skills, learned as I went, and it kind of leaves you with a new respect for people that do this thing for a living, and excel at it. But most of all, seeing what you accomplished, with all the imperfections and fuckups, whatever, it still gives you a big sense of pride and makes it all the more enjoyable when you use the car afterwards. In the end, that's one of the main reasons I embarked in this whole car restoration project. It will not turn out to be a showroom car, I know. And certainly I won't make a profit when I finally sell the beast but it doesn't matter. It's the journey, not the destination that makes it worth.
And now, more pictures of the seats. Just because I didn't have any pictures of cats handy.


Next steps:
- New tires. And since I need to replace all four, I'll probably get new wheels as well. The current wheels are kind of dull, plain, six-spoke rims from a Infinity G35 coupe. They are also too skinny at 17x7 to fit any decent-size tires.
- Paint. I'll be getting a few more quotes on the job, since I need to get rid of quite a few dents and that drives the cost up significantly.
Well there is a little leak from the upper seal of the left-side door (when the car stayed out during some heavy rain, a little water managed to get in and go down the driver's side window), but we'll see if it can be repaired (replacement is something like $800, WTF I don't know why so much for a freaking rubber seal!) And the door handles have seen better days. And there's also... ok, that's enough!
Other nits here and there, but nothing serious... really I can see myself taking this thing for a cruise and just feeling cool in it. Hopefully by the end of January. Stay tuned!


Comments
Post a Comment