Project 300zx [13] - Oil Pressure Sender
Oil is good. Like, in salads and stuff.
It's also good for moving parts, metal parts. Such as an engine.
Oil pressure is good. It makes sure lubrication gets to all the places where it's needed, and keeps rotating pieces from touching stationary pieces. Good.
Consequently, knowing your oil pressure is good.
Some cars have oil pressure gauges, others just have a warning light, some others don't have any specialized instrument because nowadays most cars have screens and computers for everything. But they all monitor this vital metric: oil pressure. Not necessarily the level, but always the pressure. And rightly so. You might have the perfect amount of oil but a bad oil pump, or a clogged oilway, or a bearing with too much wear. All of these things and many more affect the pressure and if the pressure is not right, damage will be inflicted to the engine, one way or another.
And why am I rambling about oil and how hard the damn thing is pushed to circulate the engine? Why of course, because my oil pressure sensor (or sender, as it's known) was all kinds of faulty.
The pressure when the engine, and thus the oil, is cold, tends to be high because the oil is "thicker" (close to 60psi for the Z, if you must know). At operating temperature it should drop (to around 30psi on the Z, if you insist). Because the oil pump is directly connected to the engine's cranskshaft (or camshaft in other cars) for simplicity and reliability reasons, the pressure builds up with the engine's speed. So a relief valve is fitted to cap off the maximum pressure.
The thing with my Z is, on cold starts the pressure would usually read around 60. All well and good. But then as you reach optemp, instead of settling at 30psi, it would sometimes suddenly drop to zero! That's an instant heart attack because no oil pressure means, well, just that. There's no oil circulating and that's insta-damage to the engine. In my case, the previous owner had warned me as to the sender's problem and it's a known failure point for the Z. So I ordered a new one. But, if you take out the old sender, while you get the new one in there will be a hole and through that hole, oil will come out. Some people said they just plugged the hole with their fingers while they got the new one in, but since I don't have much clearance under my car I didn't want the mess so it would have to be done while there was no oil in the engne, i.e. during an oil change. Now I've never changed my oil so I thought this was a good opportunity to do it. It's simple enough and I have seen it done many times to my cars.
What do you need? Not much.
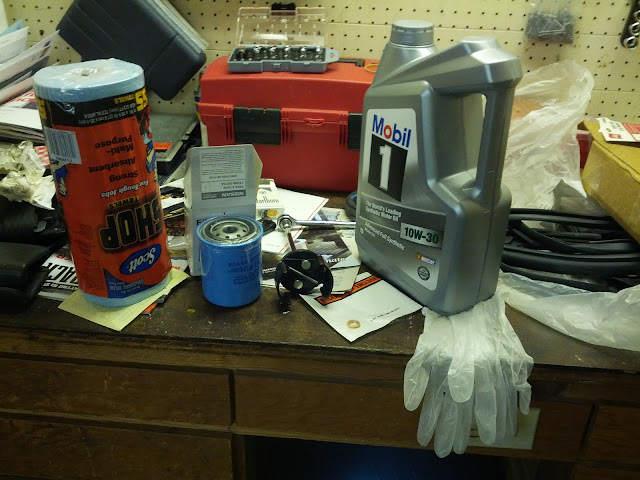
Shop towels, a new oil filter, an oil filter wrench (that black thing next to the blue oil filter), new crush washer for the drain plug (that small copper ring to the left of the gloves), 10w30 full synthetic oil, and rubber gloves. And a socket wrench, both for the oil filter wrench and for the oil drain plug.
Now, as I said, there's not much clearance under the car. Some people buy ramps to drive the front wheels on (probably the best way). Some people jack it up. In the DIY article I read, the guy would just drive the passenger side front wheel (the oily changey bits are on that side) up a 2x4 block.

So I used whatever was lying around at home; I found a wooden platform. Notice that's the driver front wheel in the picture. Obviously I didn't read that part of the DIY correctly. No harm done, I placed it on the other side and drove the right front wheel on top of the platform. Now I had around 5cm of additional room to work with. Hey, better than nothing.
A lot of people in the forums recommend driving the car to operating temp or a little below right before the change, in order to make the oil thinner and have it drain more easily. So I went out for a short drive. Obviously this makes the oil hot so you'll need to be careful when draining it, lest you get scalded.
Every oil change begins by removing the oil filler cap on top of the engine. You want the used oil to drain, right? And you want air to replace that oil, not a vacuum. So there you go. Out with the filler cap.
 That gray metal thing you see with arms stretching towards the center is known as the plenum (a term that was coined to mean "the opposite of a vacuum"). It holds air at positive pressure, so that it may enter the cylinders when time is due. In a naturally aspirated car, the air is just sucked by the piston going down. In a forced induction vehicle (turbocharged or supercharged), the air has more pressure in it so you may stuff more of it in the cylinder, and consequently more fuel to burn that oxygen. Those "arms" are carefully designed to channel the air in an optimum manner. There's a whole science field for designing intake manifolds. Ok, enough digression.
Next step, take out the oil drain plug. But wait! You don't want the oil to just spill on the floor. So you place a pan underneath.

The oil drain plug is that bolt on the black oil pan, just below and to the right of the white canister, which is the oil filter.
The drain plug in this car has a crush washer that ensures a tight seal. It's a piece of soft metal (such as aluminum or copper) that deforms when tightening the plug. Here it is, the new washer alongside the old one still on the plug. It's copper... you'll need to believe me because the white balance is all messed up in this pic. Damned phone cameras.

While the oil is draining, you have to take the oil filter out to be replaced. Here it is in the pan, after all the oil was drained out of the engine:

So now's the time to replace the oil pressure sender. In the Z, it is placed right beside the oil filter (there's very little room in there, so I don't know how people are able to replace the sender without taking the filter out).
A 14mm wrench is needed to unscrew the sender, and here it is, in comparison to the new one:

I bet you can tell which is which. The black plastic section on the bottom is the electrical connection that actually carries the signal that the sender collects. It was pretty worn and cracked, no wonder the thing was giving whacky readings. I made the good decision to also order the connector that snaps into the sender, because it was pretty cracked as well. All those years under heat make the plastic really brittle. Here's a shot of the connections on the old and new senders.

And here's the connector that I would need to replace as well, alongside the new one.

Another shot, in this one you can see the rubber boot that covers the connector to shield it from the elements. It's in bad shape, but I have no replacement for it so I would only patch it up as well as I could.

Ok, fast forward a little bit. The new oil filter is screwed on by hand, after I replaced the sender and mended all with electrical tape. In the next shot you can barely see the sender, the rubber boot and the green electrical tape I used to mend it.

And here's a better detail shot of the new sender and boot.

And yet another shot, directly pointing up from below, where you can also see the sender and a little bit of white teflon tape I used. The old one had teflon, so I figured I should use it too.

Ok so that's pretty much it. This post has surely been pretty boring to anyone with basic car maintenance experience. To me it was very exciting to get to do this for my car.
Now about the waste: in many places, shops and other establishments are required to receive your used oil and dispose of it properly. In my case, the city contractors that take the trash also are required to handle your oil, so you just place a 1 gallon clear jug right beside your trash and recycle bins and voilà. The oil filter is placed on a clear plastic bag and they take it as well.

I took a picture of the used one in its bag, to note the part number in case I want to buy that K&N one in the future (HP-2008). This time I used an OEM Nissan filter, though.
After you're done with replacing everything, just pour in new oil. But you need to be very careful not to overfill. So I followed the spec, just shy of the required amount, and measured with the dipstick, adding in little increments. It's better to add little bits than to overfill and having to drain or syphon out the excess.
It's as bad or worse to overfill that it is not to have enough oil because at some point the level reaches the rotating crankshaft (which shouldn't happen) and the oil froths, starving the oil pickup tube or sending foamed oil with air bubbles into the engine. Your pressure will drop significantly and we already know that low pressure is bad. If you seriously overfill, the crankshaft will actually have too much resistance rotating against the oil, and severe damage can also result.
After all is done, fire up the engine and watch the pressure. It may start low, but should quickly rise up to normal levels. In my case, right up to around 40 psi as the new oil was cold. Success! Go for a short, mild drive and check that the pressure drops to normal. Upon returning, check for leaks. Everything looks good.
Now as I write this, it's been a couple days. The pressure gauge seems spot on, starting at 60 when cold, holding steady at 30 at operational temp, and rising right around 10psi per 1,000 RPM. Nice!
Tomorrow I'll get under the car just to be sure, to examine for any leaks. Also check the oil level and top off as needed, because it may drop a little as oil re-enters every passageway that was drained.
Good! Another item off the list... only a couple remaining items now!
A final word on the importance of oil: particularly on turbocharged engines, the turbos don't have provisions to get cooled by water, so it's only the oil cooling them. That's why usually a thinner oil is used on turbo engines so it may circulate easily to extract heat from the rotating assemblies. Even in naturally aspirated cars, the oil also aids in cooling the engine; one more reason to keep it circulating.
Some cars have oil coolers to aid with this task, and the 300zx is no exception. Looks just like a small radiator and is placed close to the main water radiator, in fact.
Enough with this post already. Stay tuned, see you next time.
It's also good for moving parts, metal parts. Such as an engine.
Oil pressure is good. It makes sure lubrication gets to all the places where it's needed, and keeps rotating pieces from touching stationary pieces. Good.
Consequently, knowing your oil pressure is good.
Some cars have oil pressure gauges, others just have a warning light, some others don't have any specialized instrument because nowadays most cars have screens and computers for everything. But they all monitor this vital metric: oil pressure. Not necessarily the level, but always the pressure. And rightly so. You might have the perfect amount of oil but a bad oil pump, or a clogged oilway, or a bearing with too much wear. All of these things and many more affect the pressure and if the pressure is not right, damage will be inflicted to the engine, one way or another.
And why am I rambling about oil and how hard the damn thing is pushed to circulate the engine? Why of course, because my oil pressure sensor (or sender, as it's known) was all kinds of faulty.
The pressure when the engine, and thus the oil, is cold, tends to be high because the oil is "thicker" (close to 60psi for the Z, if you must know). At operating temperature it should drop (to around 30psi on the Z, if you insist). Because the oil pump is directly connected to the engine's cranskshaft (or camshaft in other cars) for simplicity and reliability reasons, the pressure builds up with the engine's speed. So a relief valve is fitted to cap off the maximum pressure.
The thing with my Z is, on cold starts the pressure would usually read around 60. All well and good. But then as you reach optemp, instead of settling at 30psi, it would sometimes suddenly drop to zero! That's an instant heart attack because no oil pressure means, well, just that. There's no oil circulating and that's insta-damage to the engine. In my case, the previous owner had warned me as to the sender's problem and it's a known failure point for the Z. So I ordered a new one. But, if you take out the old sender, while you get the new one in there will be a hole and through that hole, oil will come out. Some people said they just plugged the hole with their fingers while they got the new one in, but since I don't have much clearance under my car I didn't want the mess so it would have to be done while there was no oil in the engne, i.e. during an oil change. Now I've never changed my oil so I thought this was a good opportunity to do it. It's simple enough and I have seen it done many times to my cars.
What do you need? Not much.

Now, as I said, there's not much clearance under the car. Some people buy ramps to drive the front wheels on (probably the best way). Some people jack it up. In the DIY article I read, the guy would just drive the passenger side front wheel (the oily changey bits are on that side) up a 2x4 block.

So I used whatever was lying around at home; I found a wooden platform. Notice that's the driver front wheel in the picture. Obviously I didn't read that part of the DIY correctly. No harm done, I placed it on the other side and drove the right front wheel on top of the platform. Now I had around 5cm of additional room to work with. Hey, better than nothing.
A lot of people in the forums recommend driving the car to operating temp or a little below right before the change, in order to make the oil thinner and have it drain more easily. So I went out for a short drive. Obviously this makes the oil hot so you'll need to be careful when draining it, lest you get scalded.
Every oil change begins by removing the oil filler cap on top of the engine. You want the used oil to drain, right? And you want air to replace that oil, not a vacuum. So there you go. Out with the filler cap.

Next step, take out the oil drain plug. But wait! You don't want the oil to just spill on the floor. So you place a pan underneath.

The oil drain plug is that bolt on the black oil pan, just below and to the right of the white canister, which is the oil filter.
The drain plug in this car has a crush washer that ensures a tight seal. It's a piece of soft metal (such as aluminum or copper) that deforms when tightening the plug. Here it is, the new washer alongside the old one still on the plug. It's copper... you'll need to believe me because the white balance is all messed up in this pic. Damned phone cameras.

While the oil is draining, you have to take the oil filter out to be replaced. Here it is in the pan, after all the oil was drained out of the engine:

So now's the time to replace the oil pressure sender. In the Z, it is placed right beside the oil filter (there's very little room in there, so I don't know how people are able to replace the sender without taking the filter out).
A 14mm wrench is needed to unscrew the sender, and here it is, in comparison to the new one:

I bet you can tell which is which. The black plastic section on the bottom is the electrical connection that actually carries the signal that the sender collects. It was pretty worn and cracked, no wonder the thing was giving whacky readings. I made the good decision to also order the connector that snaps into the sender, because it was pretty cracked as well. All those years under heat make the plastic really brittle. Here's a shot of the connections on the old and new senders.

And here's the connector that I would need to replace as well, alongside the new one.

Another shot, in this one you can see the rubber boot that covers the connector to shield it from the elements. It's in bad shape, but I have no replacement for it so I would only patch it up as well as I could.

Ok, fast forward a little bit. The new oil filter is screwed on by hand, after I replaced the sender and mended all with electrical tape. In the next shot you can barely see the sender, the rubber boot and the green electrical tape I used to mend it.

And here's a better detail shot of the new sender and boot.

And yet another shot, directly pointing up from below, where you can also see the sender and a little bit of white teflon tape I used. The old one had teflon, so I figured I should use it too.

Ok so that's pretty much it. This post has surely been pretty boring to anyone with basic car maintenance experience. To me it was very exciting to get to do this for my car.
Now about the waste: in many places, shops and other establishments are required to receive your used oil and dispose of it properly. In my case, the city contractors that take the trash also are required to handle your oil, so you just place a 1 gallon clear jug right beside your trash and recycle bins and voilà. The oil filter is placed on a clear plastic bag and they take it as well.

I took a picture of the used one in its bag, to note the part number in case I want to buy that K&N one in the future (HP-2008). This time I used an OEM Nissan filter, though.
After you're done with replacing everything, just pour in new oil. But you need to be very careful not to overfill. So I followed the spec, just shy of the required amount, and measured with the dipstick, adding in little increments. It's better to add little bits than to overfill and having to drain or syphon out the excess.
It's as bad or worse to overfill that it is not to have enough oil because at some point the level reaches the rotating crankshaft (which shouldn't happen) and the oil froths, starving the oil pickup tube or sending foamed oil with air bubbles into the engine. Your pressure will drop significantly and we already know that low pressure is bad. If you seriously overfill, the crankshaft will actually have too much resistance rotating against the oil, and severe damage can also result.
After all is done, fire up the engine and watch the pressure. It may start low, but should quickly rise up to normal levels. In my case, right up to around 40 psi as the new oil was cold. Success! Go for a short, mild drive and check that the pressure drops to normal. Upon returning, check for leaks. Everything looks good.
Now as I write this, it's been a couple days. The pressure gauge seems spot on, starting at 60 when cold, holding steady at 30 at operational temp, and rising right around 10psi per 1,000 RPM. Nice!
Tomorrow I'll get under the car just to be sure, to examine for any leaks. Also check the oil level and top off as needed, because it may drop a little as oil re-enters every passageway that was drained.
Good! Another item off the list... only a couple remaining items now!
A final word on the importance of oil: particularly on turbocharged engines, the turbos don't have provisions to get cooled by water, so it's only the oil cooling them. That's why usually a thinner oil is used on turbo engines so it may circulate easily to extract heat from the rotating assemblies. Even in naturally aspirated cars, the oil also aids in cooling the engine; one more reason to keep it circulating.
Some cars have oil coolers to aid with this task, and the 300zx is no exception. Looks just like a small radiator and is placed close to the main water radiator, in fact.
Enough with this post already. Stay tuned, see you next time.


Comments
Post a Comment